Sunday, June 5, 2011

I Graduated Yesterday! BFA


Parts did not come in on time to do the carbon steel or scrap metal pour.


So we improvised by using my crucible furnace and did some experimenting with a brass and copper mix. Then we did a bronze pour. The brass and copper did not mix well and the brass was ready to pour way before the copper. The natural patina from the pour is extraordinary though. On the bronze pour it went perfect, we poured 2 open-faced medallians, 2 closed mold medallians, 1 bonded sand mold of a rabbit that I carved out, and a huge ingot.

Thursday, May 19, 2011

The 4 Good Ingots.....


5/07/2011
Results were not as impressive as the melt. When I cut the gates to two of the (what I thought were good) ingots there was visible shrinkage. Matter of fact the whole ingot and gating system was hollow. I couldn’t have done that on purpose if I tried. The ingots looked perfectly good on the outside. I think it was caused by a combination of things, the first being that the pour temperature was too hot. The metal was shooting sparks, which is a sure sign of burning metal. The second thing is the straps securing the layers of the mold melted and released the pressure holding them together. This resulted in the metal surging out of the mold through the cracks. I think that this molten metal surging out of the mold actually pulled the still molten metal in the mold out with it, leaving only the cooling metal. The first metal to be poured and to touch the sand mold cooled and did not exit. These sand molds were not preheated in any way either, this also may be something to look into. To prevent the molds separating again, I have proposed to band the molds tight over angle iron along the length of the molds. Once tight weld the angle in place using ¼” round rod, just incase the metal flows over again melting the banding. To help prevent the metal flowing over again I also plan on using a larger pour cup.
Even though the ingots were not successful, I definitely feel that this was a huge learning experience. If I can figure out all the kinks of melting small amounts of scrap steel, the sky is the limit. Scrap steel is probably the most affordable and abundant metal available. To be able to melt and pour it into art or part on demand, I feel would be a huge advantage and again the possibilities are endless.

Wednesday, May 18, 2011

Any Tips on the Steel Pour Please Post

Any Info or Tips helps

Photos Explained Below


"SCRAP METAL STEEL" Melt and pour!!!!!!!


Scrap Steel Pour 5/5/11
David Fields (Artist), Allen Peterson (Professor), Stephen Bodner (Shop Manager)
Written by David Fields
This is a real ”scrap metal” melting. The scrap metal parts and pieces are from the collection of David Fields. All the parts and pieces have been collected over a 10-year period. All parts and pieces have been photo documented and categorized before being melted.

There were many, many things learned on this day. The first thing being that I was not prepared for the amount of time that this part of my project would take. Nor was I aware of the lack of information available on small-scale steel melting and casting. All the info that I could find was on what the steel industry considers small, 1 ton. I would be using a crucible that would hold 50 pounds of steel. A metallurgist told us that small scale melting was not easily possible. He said that the steel oxidizes when it heats up to melting temperatures and then turns to slag not letting any steel become molten. So in hearing this I thought that the whole Idea of this project might fall through. He suggested and I saw from a couple of large scale melting furnace diagrams that a line of shielding gas be used. Argon is used for shielding gas in mig and tig welding also, makes sense. While researching I also saw a series of steel melting experiments done by melting steel rods by dipping them into a molten steel bath. These experiments will help later in my own project. In my project I wanted to melt scrap metal in three different batch types American, Chinese, and Miscellaneous.
We started the melting process with the Chinese metal and added an argon blast from a hose positioned to the side and blowing into the furnace. I had a whole lot of Chinese angle from ATV and motorcycle crates from china to melt down. I made bonded sand molds to cast ingots out of the steel. We filled the induction furnace with scrap angle and flat steel for the first batch. In this induction furnace the heat/temperature is set by the percentage of wattage used, stainless steel melts at around 30%. In 45 minutes we had moved it all the way up to 70% and the Chinese steel had not started to melt. It was cherry red but that was as far as it would go. I asked the shop manager if we should put one of my thicker chunks of metal (American) in the bottom to maybe make a puddle in the bottom, then the thin stuff might melt better under the other molten metal like in the experiments I had seen. He said its worth a try so we pulled out some of the angle and pushed some 5/8” plate (American) into the bottom.
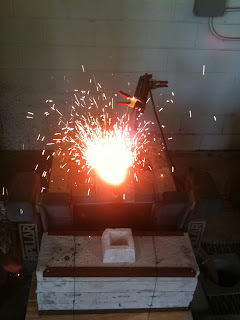
Watching the plate it almost immediately turned cherry red, then bright yellow, But it was not melting. So I asked, should we put an even thicker piece in because the plate seems to be getting much hotter than the angle? Sounds good to me he said. So I got some really big American pieces that I had cut off of a trailer hitch that were about an inch thick and 6” long and my professor Allan Peterson put those in. Within 5 minutes it was melting so we pulled all of the angle out and started putting in thick American metal parts. It started melting so fast after that that it was burning the metal and shooting sparks everywhere. Stephen the shop manager started turning the furnace down and by the time we poured it was at 20%. When we measured the temp with a pyrometer it was 2850 degrees Fahrenheit. One of the last pieces in was a lawn mower blade whole; it just sank right down into the furnace.
The pour was not as successful as the melt though. There was no slag pulled off of this molten metal. As we begun to pour the liquid metal ran over the side of the pour cup and the metal made contact with the bailing wire straps holding the mold tightly secure. The wire snapped releasing the pressure holding the mold together and the molten metal blew out the back of the 2nd tier of the mold. There was loud popping and hissing then fire and smoke. The molten metal hitting the concrete was popping and it was also melting the hydraulic lines under the furnace. There was lots of smoke and nerves on end. When everything was secure, I broke apart the mold to see what we had accomplished. There were 8 incomplete ingots and 4 good ingots. 4 Good Ingots!!! Not a whole lot of product but massive learning at pouring ingots. I hope to try again in the near future.
I have to convince my professor and shop manager that we can do it safer and quicker with more product as a result. Better binding on the molds and starting off with thicker metal. I don’t have thicker Chinese metal so I propose to forge or weld the thin metal into bigger chunks to load the furnace with.

MORE TO COME!

Friday, March 25, 2011

Artistsmecca Event

I'll be attending an Artistsmecca event in Peachtree City, GA on the 2nd of April here's the link-http://artistsmecca.com/events/artistsmecca-at-booksamillion
I'll be showing some of my work and hope to see alot more there too.
Come out and say hi.

Tuesday, November 30, 2010

What I am working on now.

In my work so far, I have used primarily scrap or used parts that have been thrown away because they are worn out or defective. The majority of scrap metal is discarded or sent to a recycler to be melted down and reused as an alloy. Most of the recycling happens over seas and is sent back to the United States or around the world as saleable products. My plan is to gather metal pieces that I have had for a while and not been able to incorporate into a sculpture (“twice rejected” parts), photograph these pieces for documentation, then melt them down and cast them into ingots. These ingots will be separated into categories depending on where the metal comes from and stamped accordingly. The ingots may then be used to make cast steel sculptures or formed back into parts again to incorporate into a sculpture. Also to produce commissioned Parts or pieces made to order.

To display the process and progress of the piece, I’ll use the photo documentation, the ingots made so far, the pallet to display the ingots on, and the pedestals to raise the pallet and the photo documentation on. The photo album will be on a pedestal by itself. There will be another pedestal for the ingots display. I will construct a pallet to stack the ingots on top of the pedestal. The pedestals will be made from repurposed parts also. Also any paint or finishing products for the pieces made will be used from left over stock from previous projects.

There will not be an exact temperature that the scrap will melt at to create the ingots. The Reason is that most steel is an alloy, which means a mixture of different metals. Alloys are created to give the steel different qualities depending on what is needed. Some are made to be more corrosion resistant, some to be stronger or more heat resistant. There are too many combinations for me to go into detail about what temperatures that I could need and for what reasons. Also because of the possible extreme temperatures a standard crucible will not be sufficient and neither will a ceramic lost wax cast. I will have to use multiple cast sand molds every time I cast ingots, because the molds will be destroyed every cast from the heat. My plan is to try both green sand and bonded sand techniques for the molds. My pattern will be made from wood and be stackable, with a gating system that can be used with one or multiple sets of four. The gating system after the ingots are poured will be removed from the ingots creating an additional rejection of the metal “Three Times Rejected.” It will become it own batch “Three Times Rejected” to be stamped R3.

The pallet or pallets are to be constructed out of very nice or exotic wood. It should be very well made and pleasing to look at when standing alone but will not detract from the overall purpose of the piece. All fasteners if needed will be flush to the wood and sanded to a shinny finish. The ingots will be stacked on the pallet each layer alternating back and forth. Ingots will be marked with a stamp indicating what batch of metal they came from and the origins they are thought to be from. I will also be looking into having a metallurgical breakdown performed on some of the ingots and a copy displayed for the show.

Documentation will consist of photographing the parts to be melted down, weighing the parts to be melted, and documenting the weights of each part. I will describe the original purpose of the part if known such as car part, lawn mower part, or other and also the origin of the part. The documentation of the parts used and their photos will be assembled into a parts catalogue. Once documented and catalogued it will be assigned a batch number linked to its purpose and origin. This batch number will be included in its stamp. Hopefully this parts catalogue will grow and so will the show to include many different types of metal.

New Show Concept Implements (Table, Podium, and Pattern)

These are the patterns I made to make the molds for the Ingots. They will be stackable so multiples of four can be poured at once.


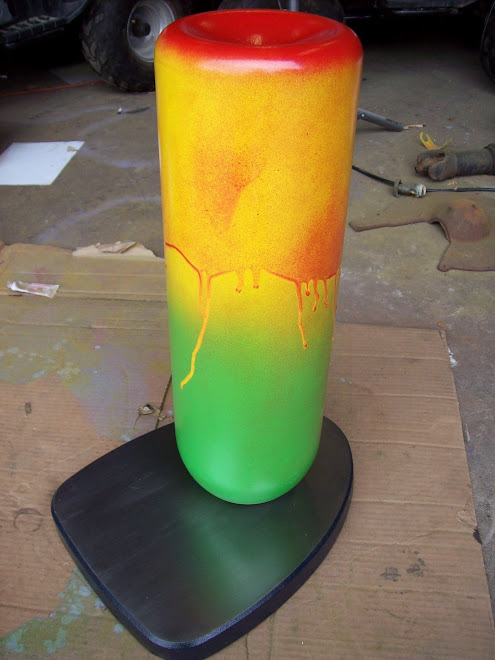
Made from repurposed parts and tools. Table, Podium, and Photo Documentation.


Saturday, May 22, 2010

Video from my crucible furnace test run.

I made the furnace, crucible tongs (for taking the crucible out of the furnace and putting it in the crucible shank), and the crucible shank (for picking up the crucible and pouring the molten metal.) The furnace is not completely finished yet, but far enough to test out. It worked great! We poured 3 ingots of bronze for the test. You can see the full size video at youtube at this link http://www.youtube.com/user/dfield23

Saturday, April 10, 2010

"Blue Husky" Encore

Show went fairly well, couple of minor repairs, lots of people, lots of people havin lots of fun inside the "Blue Husky" I'll post some stuff later.

Thursday, April 8, 2010

"Blue Husky" Encore

I Know It's late but tomorrow there will be an encore opening of the "Blue Husky" installation from 7-10 P.M. at 116 Walker St. in Atlanta. Everyone come and check it out. There will also be an artwalk going on throughout Castleberry Hills.

Tuesday, March 16, 2010

Foundry Projects


Finally finished the foundry pieces. The Faucet/spigot is bronze with a stainless steel hand valve, the iron sun is painted, and the iron anvil is gun blued and polished. The process pictures are below on previous posts.